Hub API Quickstart 🚀
Hub API is an Intuitive Deployment Platform for Serving AI Models as Serverless Inference APIs. Get started with deploying your first model as an API in this quickstart guide. We will be deploying a simple Sentiment Analysis Model in this Tutorial. This tutorial covers the deployment in both PyTorch and Tensorflow/Keras.
Before you Begin
This guide is available in the form of a notebook that you can run through and is also the recommended way. Download and upload the Hub API Quickstart.ipynb notebook to your Hub Workspace and execute it.
Background#
CellStrat Hub API is a deployment service to deploy any model as a Serverless Inference API.
- 🚀 Deploy your Model in under 15 minutes
- 🧰 Simple yet fully customizable deployment without any format requirements and framework agnostic
- 🌐 Model is Deployed as Serverless APIs, which means you only pay for the number of invocations, unlike traditional deployment options where you have to pay for idle time as well.
- 🏗️ APIs are auto-scaled based on traffic, so you don't need to worry about the deployment infrastructure and can focus on building your model.*
- 🐳 All models are deployed using a docker container under the hood, that means you get complete control over your execution environment, allowing you to optimize your inference in low-level languages like C++ also.
- 📡 You can deploy a maximum of 5 APIs for free with 1000 API calls.
Let's understand some basics of API development before we start with the deployment.
What is a REST API?#
 An API (Application Programming Interface) is a way for two computers to talk to each other. It's similar to accessing a website but instead of using a graphical interface like buttons and forms to interact, we use code to directly access data from the servers. Most Web/HTTP APIs are RESTful, meaning they follow a set of rules and design patterns known as Representational State Transfer or REST. The CellStrat Hub API platform deploys your models as a REST API.
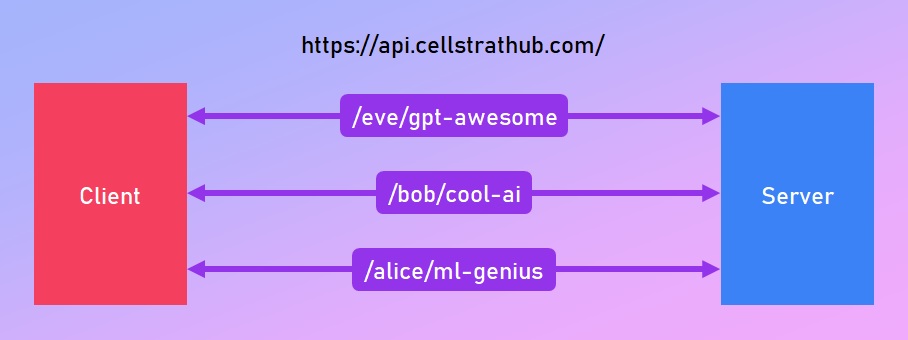 RESTful APIs organize data into a set of unique URIs (Uniform Resource Indentifier) that help access different data resources or web services hosted on a particular server. For example, in the endpoint
 https://api.cellstrathub.com/alice/my-ml-project, the api.cellstrathub.com part is the server address and alice/my-ml-project is a resource on the server that we would like access.
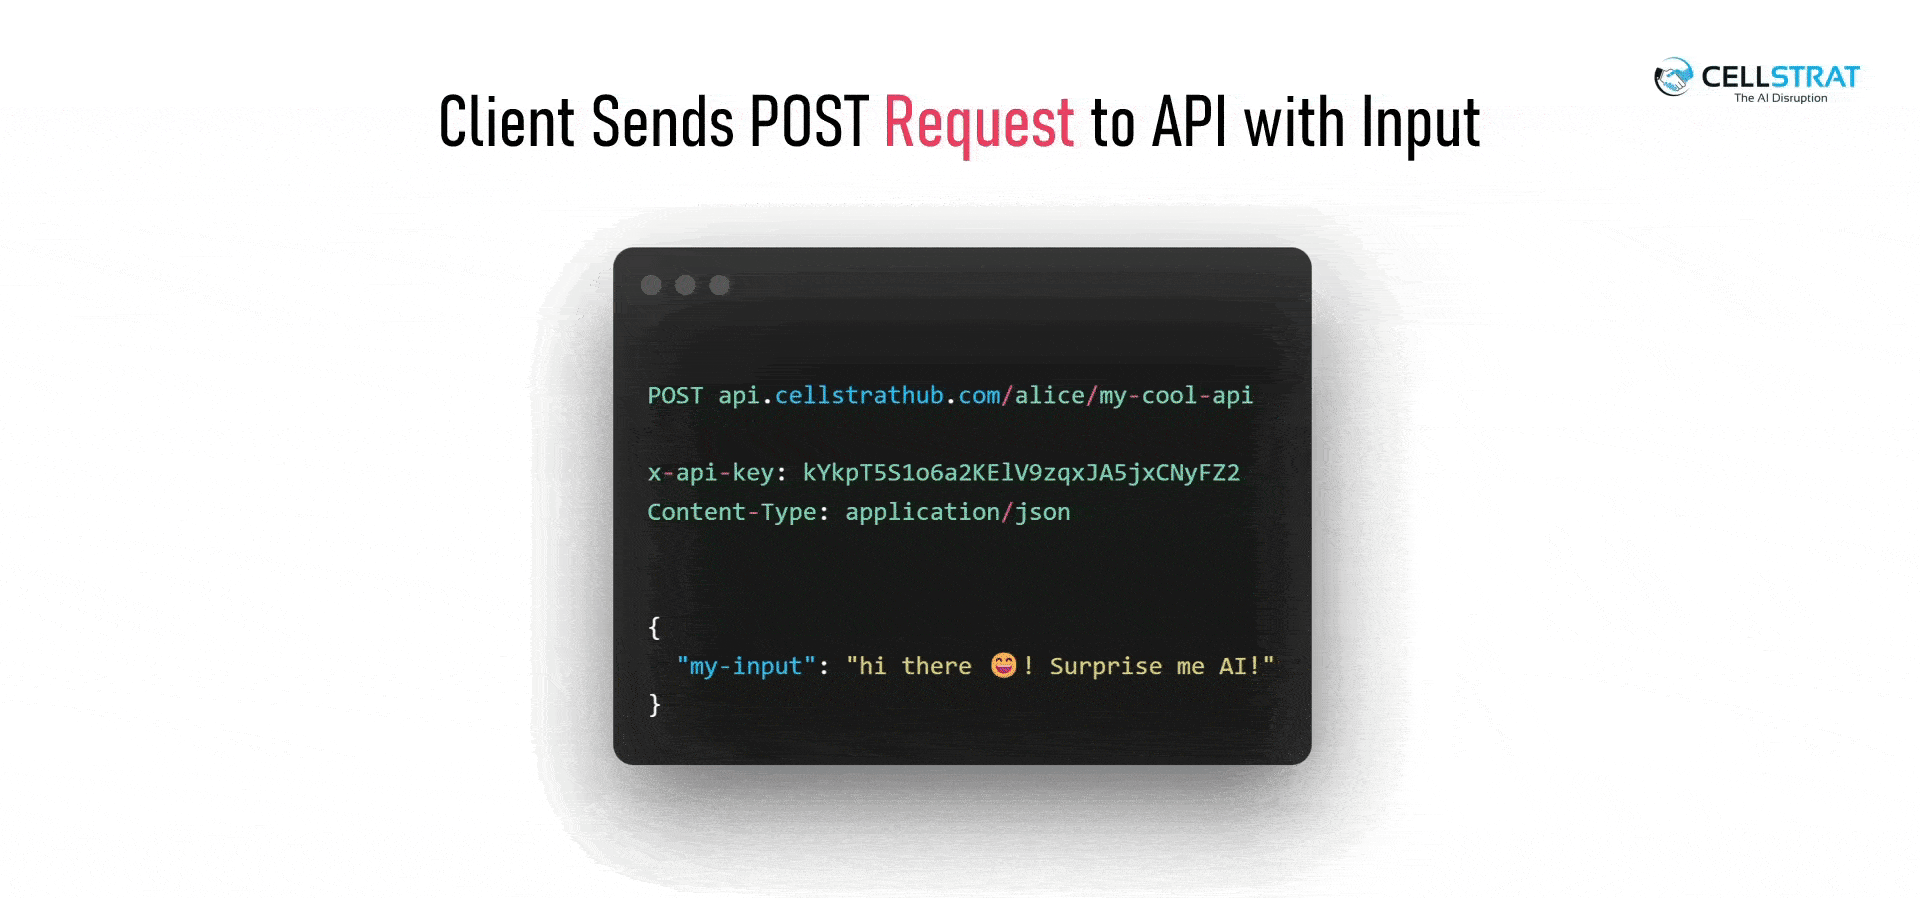
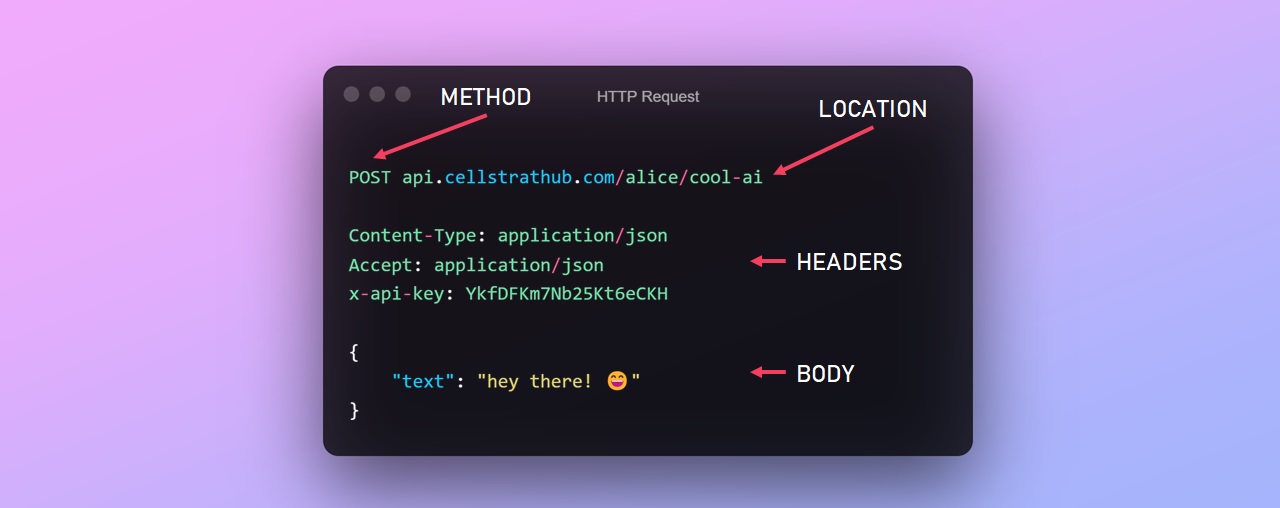 A client can access the web service by making a http request to the server's endpoint. The request message follows a format where it defines the REST method being used, the address of the endpoint, some headers which tell what kind of data it is, the authentication aspects etc and then the body of the message that is actually taken by the service as input.
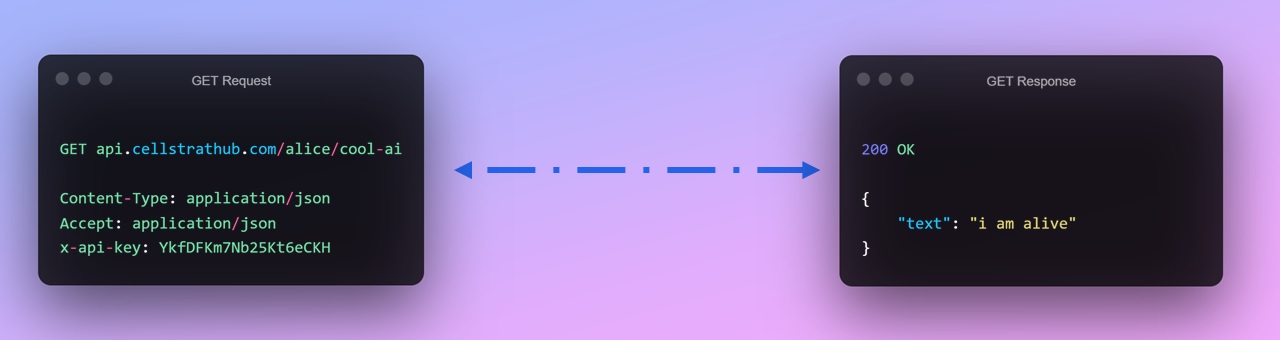
GET Request#
The GET method is used to read the data from a resource. In this method, the client doesn't send any message body to the endpoint/server, it just calls it and the server responds with some data. This method is used in Hub API to ping the model and load it memory.
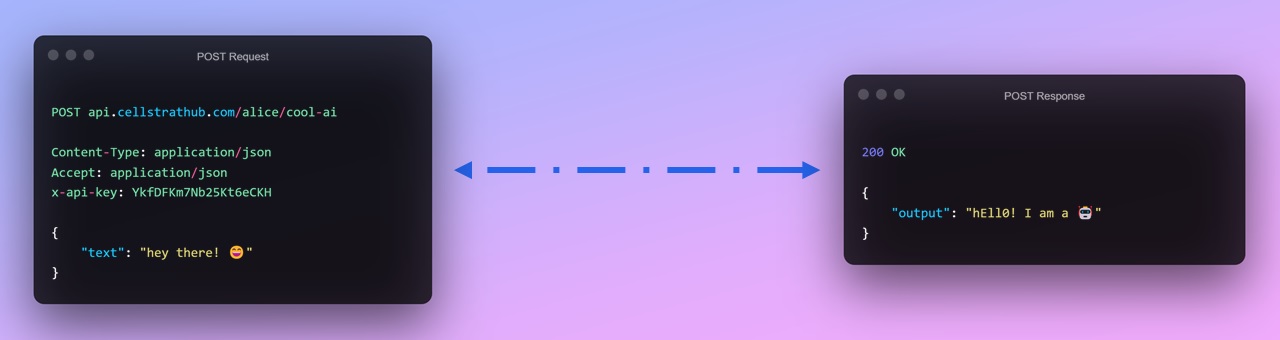
POST Request#
The POST method is used to send some data to the server and then get some data in response. This method is used by the client to send the input data to the Hub API model which then performs inference on it and then returns the prediction results to the client in the response.
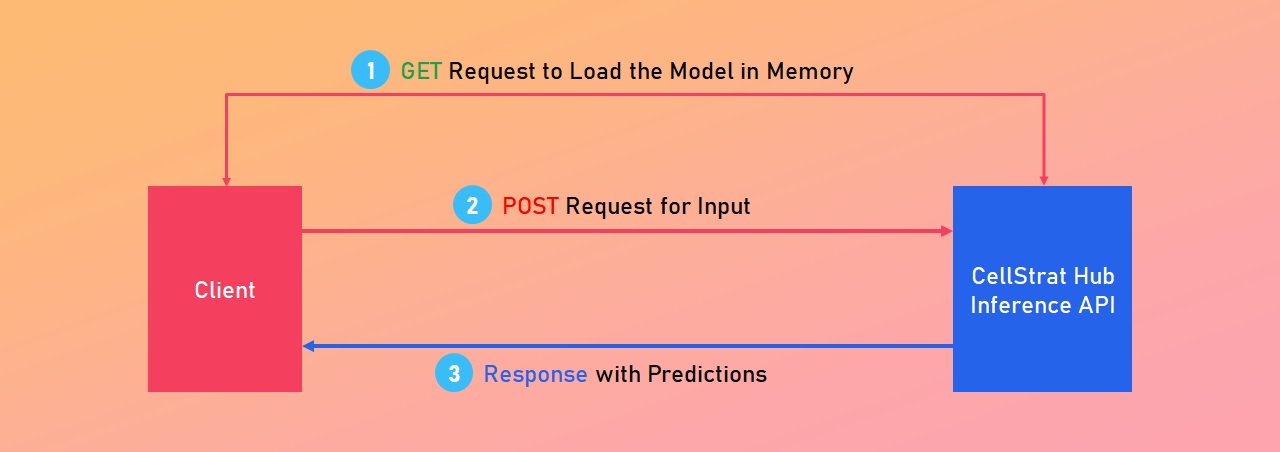
Hub API's Flow of Data#
Here's a little animation of how it all comes together when you want to make predictions using your ML model hosted as an API on CellStrat Hub
Overall Architecture#
- We start by loading the model into memory by sending a
GETrequest to the model - To make predictions we send the input data using a
POSTrequest. - The API makes the predictions and sends the response back with the result.
Deployment#
The CellStrat Hub Workspace comes with a command line tool (CLI) called hub which does all of the heavy lifting for deploying our model as an API. This tool can be accessed in the Terminal which is available by clicking on Blue Plus Button on the top-left which opens up the launcher tab where you can click on the Terminal box.
tip
You can use the --help flag to view the help menu of any command. Example: hub --help, hub init --help and so on.
Before we start, we shall download the pretrained model for sentiment analysis,
wget https://cellstrat-public.s3.amazonaws.com/hub-api-quickstart/sentiment_model.tar.gztar -xzvf sentiment_model.tar.gzInitialize#
The hub init <name of project> command generates the boilerplate code for a Hub API Project. Running this command creates a folder with the name of our project and contains all of the files and folders required for the project. Let's first run the command below and then we will take a tour of all the files generated.
hub init sentiment-analyserAfter running the command you can see a tree of files and folder generate which looks something like this,

Let's look at each one of those files,
Dockerfile- Every Hub API deployment package is essentially a docker image which contains the source code and the required libraries when built and deployed. Generally, its all automatically setup for almost all use cases so you don't need to change anything. But if you are already familiar with docker you can modify the container and optimize it further.hub_config.json- This contains some basic configuration of the project like the name of the project and its version. This file is what defines a project as a Hub API project. You don't need to change anything there as well.model/- This folder is the place where all our model weights and other large files go. The contents of this folder are stored in a separate network storage and not part for the docker image so the image size remains as minimal as possible. The contents of this folder are available in theMODEL_DIRenvironment variable in your source code.src/- This is where all your source code goes in and it already has a few boilerplate files generated.main.py- This is the main python file which gets executed whenever a request is made to your model. We will explore it more as we go further.requirements.txt- This is where you will list out the libraries required for your model to run.utils.py- This is just a module which contains some utility methods for common operations which you might need when working with things like base64 encoded images. You can add your own utilities in this file.
Integrate#
The next step is basically the part where you come in and,
- Copy your model files in the
model/folder - Add your own code in the
main.pyfile - List out the libraries needed to run the model
Let's breakdown the main.py file where our prediction code will be integrated.
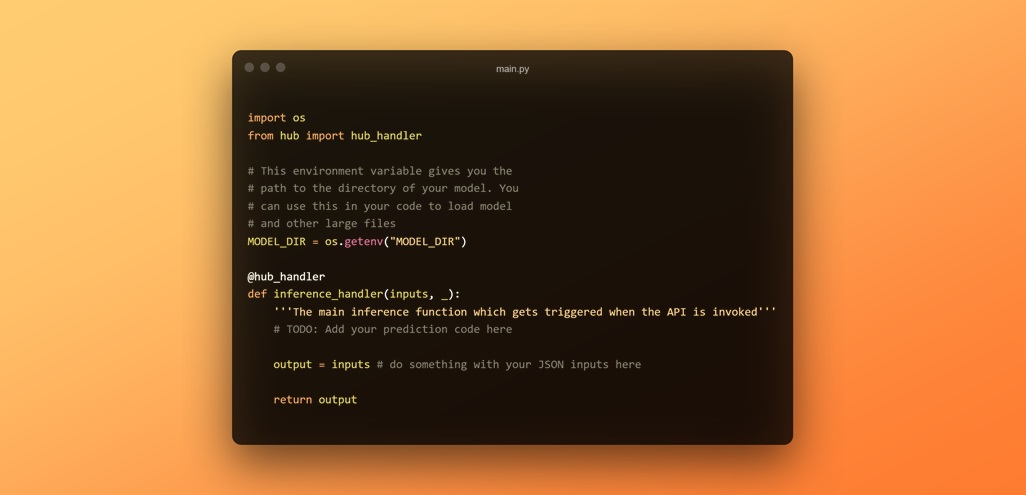
The auto-generated file starts with a couple basic imports and a @hub_handler decorator which is used on the inference_handler() function. This decorator basically indicates that its the function which needs to be executed for inference and adds some additional functionality internally like ping for when we make a GET request to load the model in memory.
The MODEL_DIR is variable is the path which points to the folder where all the model files reside. We will use this variable when we load our model.
Our main prediction code goes inside the inference_handler() function and our inputs will be available in the input argument of the function which is essentially a python dictionary (JSON body from the client). In this particular case of sentiment analysis model, we will accept either a string of text or a list of multiple sentences on which we will perform sentiment analysis. Input can be anything that is JSON serializable i.e., all the standard data types like integers, floats, lists/tuples, strings and dictionaries. What format you want to accept the input is entirely upto you. Generally we accept the inputs in a dictionary format but to keep things simple we will keep it as strings/lists because our model code can work with both.
Adding our prediction code to main.py should look something like this,
import osfrom hub import hub_handlerimport torch # +++ ADDED THIS +++from transformers import AutoTokenizer, AutoModelForSequenceClassification # +++ ADDED THIS +++
MODEL_DIR = os.getenv("MODEL_DIR")
model = AutoModelForSequenceClassification.from_pretrained(MODEL_DIR) # +++ ADDED THIS +++tokenizer = AutoTokenizer.from_pretrained(MODEL_DIR) # +++ ADDED THIS +++
@hub_handlerdef inference_handler(inputs, _):    '''The main inference function which gets triggered when the API is invoked'''    # +++ ADDED THIS +++
    # preprocess    inputs = tokenizer(inputs, padding=True, return_tensors="pt")
    # make prediction    with torch.inference_mode():        logits = model(**inputs).logits        probs = torch.softmax(logits, dim=-1)
    # post process outputs    output = []    for prob in probs:        preds = [(model.config.id2label[i], round(p.item() * 100, 2)) for i, p in enumerate(prob)]        preds = sorted(preds, key=lambda x: x[1], reverse=True)        output.append(preds)
return outputNow we also add our two main libraries used to the requirements.txt file
torchtransformersVoila! That's it. It was that simple to integrate your own prediction code and model. As you can see the process is framework agnostic and there are no format requirements depending on framework used like pytorch, tensorflow or scikit-learn. Regardless of which library you use, you can deploy any AI model with CellStrat Hub API.
Now the only thing left is to just build our deployment package and deploy it.
Build and Deploy the Model#
We can now build our Inference API package using the hub build command. This command will upload the model files to our model storage servers and build the Docker image of our source code and dependencies locally. Once everything is built and ready, we can now deploy our API by pushing everything to the cloud using the hub deploy command. This can take 3-4 minutes to complete overall.
cd sentiment-analyserhub buildhub deployinfo
The build and deploy commands need to be run from the directory where the project is located. That is why we ran cd sentiment-analyser above.
tip
You can build and deploy together in a single command by running
hub build --deployor
hub build -dAnd there you go, your API is now live and accessible on the internet. But wait, we don't want our API to fully public as we need to have some control over who uses it and how much is used. To control just that, every API can only be invoked using a API key. In the next and also the last section of this guide, we will test our deployed model API using our API key.
Testing our API#
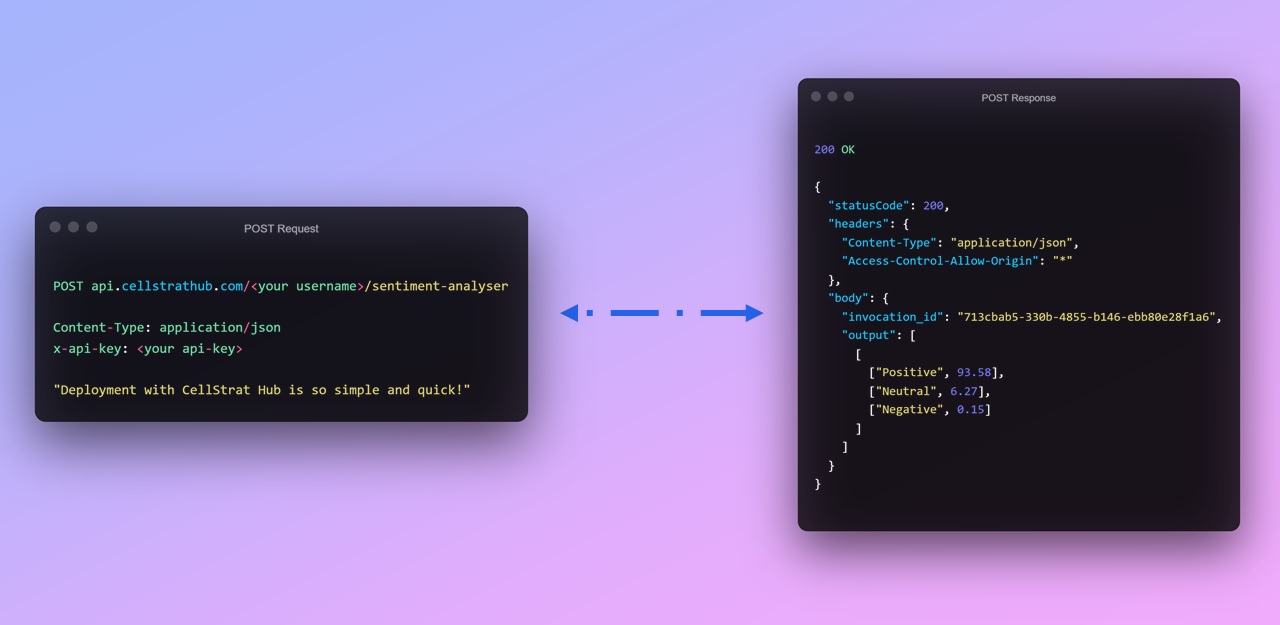
Based on our choices on how we want the input and the response, our API request-response format should look something like this:
Getting the API Key#
As our model is deployed and available as a REST API. You can see it in your deployment dashboard along with other details about your API usage for the month. In the free-tier every user can make upto 1000 API calls per month to deployed models and every API is secured against an API Key which provides access to a user to call the model. As you are the owner of the API, you can call your API by using your API key which should be available in the API Key Management table in the API Dashboard. Click on Click here to reveal API Key and copy the revealed key. This key is private to you and whenever you use this key the platform knows its you who called it. Don't share this key publicly as someone can misuse this key and finish up your monthly quota. In case it gets leaked you can delete or disable the key using the options available.
Invocation#
Without further ado, let's test our model. We can call our model from any language and place as long it has internet access. Popularly these APIs are used in conjunction with web applications using javascript. But as we don't have a web app built right now, we will call it using python itself here.
In the code below, replace the necessary values with yours'. You can get the API key from the API Dashboard as mentioned before and you can get your username (if you don't remember) from your profile.
import osimport jsonimport requestsimport base64
# Paste your key and username hereAPI_KEY = "YOUR API KEY"USERNAME = "YOUR USERNAME"API_NAME = "sentiment-analyser"
# The API endpoint for your Hub API projectendpoint = f"https://api.cellstrathub.com/{USERNAME}/{API_NAME}"
headers = { "x-api-key": API_KEY, "Content-Type": "application/json"}We first make a GET request to Ping/Load the Model in Memory
requests.get(endpoint, headers=headers).json()Now we will make a POST request to send our inputs in the body and then get the response back with the predictions.
sample_inputs = ["Deployment with CellStrat Hub is so simple and quick!",                 "I have been using CellStrat Workspace for a while now",                 "I don't like that movie. It tried to do a lot of things at once."]
payload = sample_inputs[0]
# Send the POST requestresponse = requests.post(endpoint, headers=headers, data=json.dumps(payload)).json()
if response.get('statusCode') == 200:    # Parse the output    output = response['body']['output']else:    output = response
print(output)The output should be something like this -
[[['Positive', 93.58], ['Neutral', 6.27], ['Negative', 0.15]]]What's Next?#
Congratulations on deploying your first model! Hope you found the process easy and quick. We would love to here your feedback and improve the experience. You can share your feedback here.
But, your journey in deployment doesn't stop here. You can learn more here,